Part 1 - the Lambda - API Gateway APIs with Keycloak JWT authentication
If your API Gateway service is public (meaning it's not enclosed within a VPC) then anyone in the world meaning can use (and abuse) your API. Therefore, it is imperative to have some sort of validation check on who is calling the API and to make sure the caller is authorized to interact with the API.
So this set of posts will show you how to use one of the types of API Gateway authorization, JWT authorizers. JWT is a standard for tokens that are passed (usually over HTTP) from a consumer to a service. It is most commonly used in Oauth2 environments.
API Gateway has two synchronous ways of interacting with it, along with a Websocket integration:
- HTTP API - a simple way of leveraging API Gateway. HTTP endpoints are simple to setup and expose. We will be using this pattern for this article.
- REST API - a more expansive integration pattern. The REST API endpoints allow for nearly complete control over the input and output of the calls. A future post will address security with this type of integration.
One thing that makes the HTTP API simple to integrate is that it has built in JWT authentication. This allows you to set up and API that can be pointed to any Oauth2 server to validate the token.
For this article I'll use my own Keycloak instance. Keycloak is an open-source identity and access management platform. It's super simple to get running and, as my Grandmother would have said, "the price is right" - free!
| Note: in this set of articles I am showing you the "ClickOps" method of setting up your environment by doing everything though the AWS console. This is not a best practice by any means. Best practice is to use a toolkit such as AWS CDK or others to have an IaC (Infrastructure-as-Code) environment. An IaC environment allows you to reproduce your overall infrastructure easily and allows much simpler auditing. But this is a demo - it's not meant to be the be-all and end-all for AWS best practices. |
For this article I'll be using my AWS Lambda API Gateway code. This is a very simple Java Lambda that calls another service (https://icanhazdadjoke.com/) purely for demonstration purposes. That and I like Dad jokes.
This post isn't meant to be an in depth examination of Lambda but I'll give you the basics. Again, I'm using the AWS console for this but there are better ways long term.
Start by cloning the repository. It requires Java 21 and Maven. Maven 3.9.3 was used for this code but other versions are likely to work. The instructions for building are in the source code but generally it should just be:
mvn clean package |
The output will be in target/api-gw-service-1.0.jar in your local machine. Using the AWS console, the basic deployment steps are:
Go to Lambda in the AWS console - make sure you're in the region that you want:
If you haven't created a function before, select the "Create a function" button:
After clicking "Create function" it will take a moment or two to show you the definition of the function. There are multiple things to configure but let's start by uploading the code. Under "Code source", select the "Upload from" drop down and choose ".zip or .jar file":
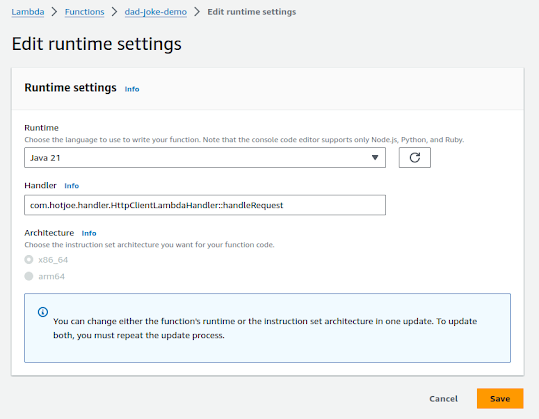
A new page will display. Update the "Handler" section to have com.hotjoe.handler.HttpClientLambdaHandler::handleRequest for the the Handler:
Don't change the "Runtime" or the Architecture (though the Java code will run on either x86_64 or arm64). Select "Save".
This enables Lambda to keep a version of your Lambda in a state that allows faster restarts. Leave the rest of the parameters the same for now. This is a very small Lambda and doesn't use anywhere close to the default of 512MB of memory. And no ephemeral storage is used at all so that setting doesn't matter.
Select the "Log stream" (yours will be named differently from mine) to display the logs. You can dig in to see what the dad joke API got (it will be nothing because the code expects an API Gateway request) and what it sent back. Note that the very first time you run the Lambda this way it will take 3 to 4 seconds to run. The next time will be closer to 150ms. This is the reason you enabled SnapStart as Java Lambdas can have a high startup time but, once cached, are very fast.


Comments